Traditional 2-axis milling on a CNC machine is still very common, you adding another axis to the equation greatly expands your possibilities. You can make parts that you might not have been able to before when just using 2-axis programming, and it can possibly reduce cycle times.
First, we must establish the difference between two and three axis machining. Most CNC mills these days should be able to accept and perform programs with 3-axis machining. Two and three axis machines both have an X, Y, and Z axis, but using that third axis for milling profiles can allow you to profile the surface of a part.
In 2-axis milling, you can move in the X and Y-axis at the same time if you’re milling the outside or inside profile of a part. If you’re using the third axis, you can make X and Z-axis moves while milling a profile, such as a waving contour. You can also move in the Y and Z-axis if you simply change the plane that you program in.
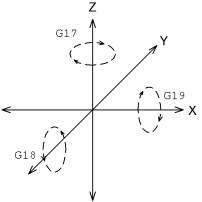
If you’re hand-writing the program, G17, G18, and G19 are the CNC commands for selecting which plane you want to machine on.
G17 is the XY plane.
G18 is the XZ plane.
G19 is the YZ plane.
Other than that, programming is virtually the same as any other G-code program. If you want to make a positive Z and negative Y move, an example would be:
G90 G20 G19 (To set the YZ plane and absolute)
G1 Y-.5 Z2.23
If you want to go back to the traditional XY plane, a line with G17 will be needed.
If you have rendering software or a program that simulates your program, I strongly recommend using it on a new program, especially if this full 3-axis machining is new to you. Good luck, and go experiment! The best is experience is with machine time and trying new things.
